

Creating a Facebook Group is fairly straightforward, and Facebook does a great job of guiding you through how to start one. However while it’s relatively easy to make a group on Facebook, in order to set your group up for success from the beginning, it’s important to do so in the most optimized way for the Facebook platform.
After-all, there’s no point in creating a group if you haven’t done it properly, and if it doesn’t have the chance to grow.
When creating a Facebook group you want to make it:
- Searchable on Facebook.
- “Recommendable” by Facebook.
- Appealing to join after a potential member finds you.
So with these points in mind, this article will show you exactly how to start a Facebook Group, and provide you with our resources and tips for optimizing your settings for success from the get go.
In this article you’ll learn how to create a Facebook Group, who should be the creator (you or your page), choosing your group name, setting your group privacy, and which settings to optimize before you start inviting members.
Jump to: Who should create your group I Choosing a group name I Choosing your group privacy I Inviting your friends I Continued group set up I FAQ
Who should create your group
The first decision you need to make before creating a Facebook Group, is who will be the group Creator.
Groups have 4 types of members:
- Creator
- Administrators
- Moderators
- Members
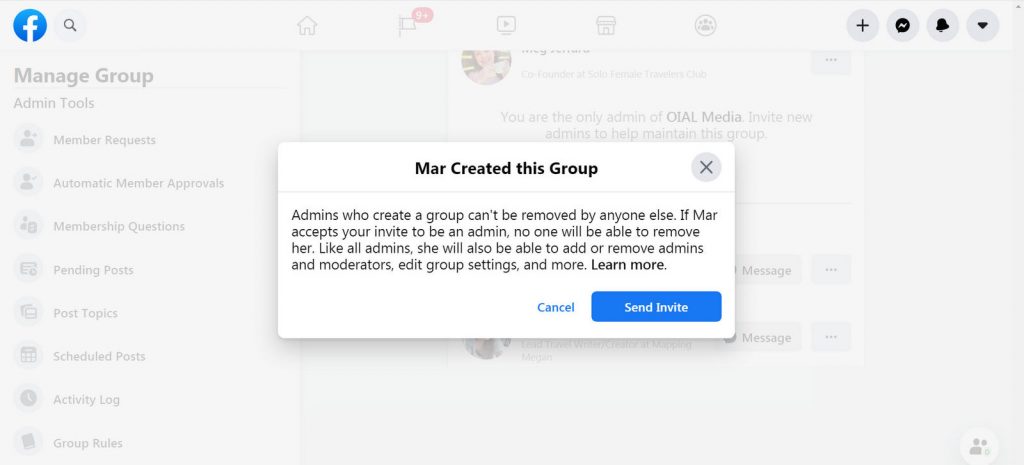
You can add as many additional administrators and moderators as you wish after the group has been created, however there can only be one original Creator, and they can’t be removed by any other admin; they have to remove themselves in order for their admin privileges to be revoked.
You’re probably thinking “easy – it’s my group, the creator will be me”. But consider whether you want to create the group from your personal profile, or as your Facebook Page.
If you create a group from your Facebook Page, your Facebook Page will be the original Creator. This can be beneficial if you are a multi-team business, because it means the group will be controlled by whoever controls the page. You can then add your personal profile to the group as a backup administrator.
If you create a group from your personal profile, you personally will be the original Creator, and you can then proceed to link your page as a secondary administrator.
This is beneficial if multiple people run your page though you want sole ownership of your group, but it does leave you vulnerable to losing the group should your profile be hacked or compromised (though business pages should also take precautions against hacks).
This table summarizes who can fill each role, and who can remove who in a group:
| Member | Moderator | Admin | Creator | |
|---|---|---|---|---|
| Who can be a | Individual or page | Individual or page | Individual or page | Individual or page |
| Can be removed by | Admins and Moderators | Administrators | Administrators | Only themselves |
Pro tip: If the creator of a group does remove themselves, and then re-joins the admin team at a later time, they will regain the privileges that come with their creator status.
Action Item: Who will be your group creator? Your page? Or your personal profile? The process of creating a Facebook group from each is slightly different, as outlined below.
How to Create a Facebook group from your personal profile
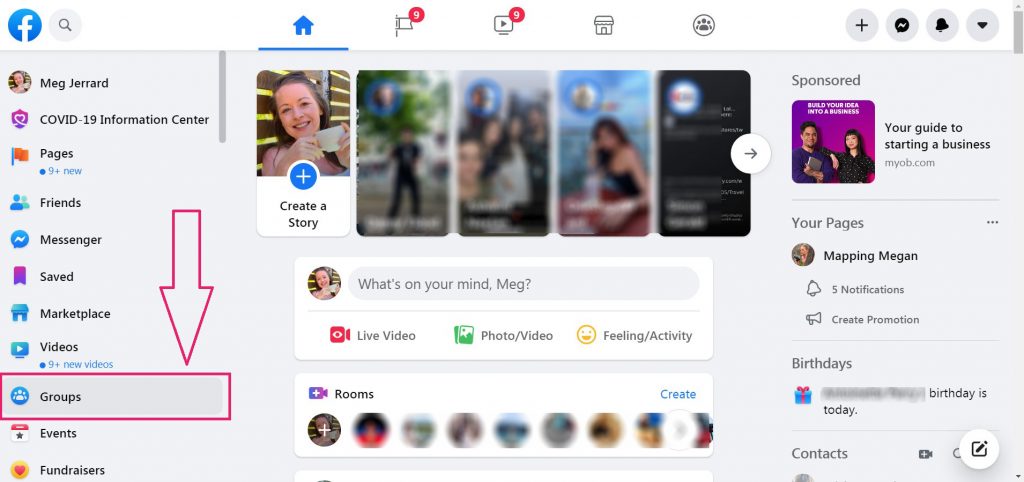
- To create a group from your personal profile click on the groups shortcut in the left hand sidebar of Facebook.
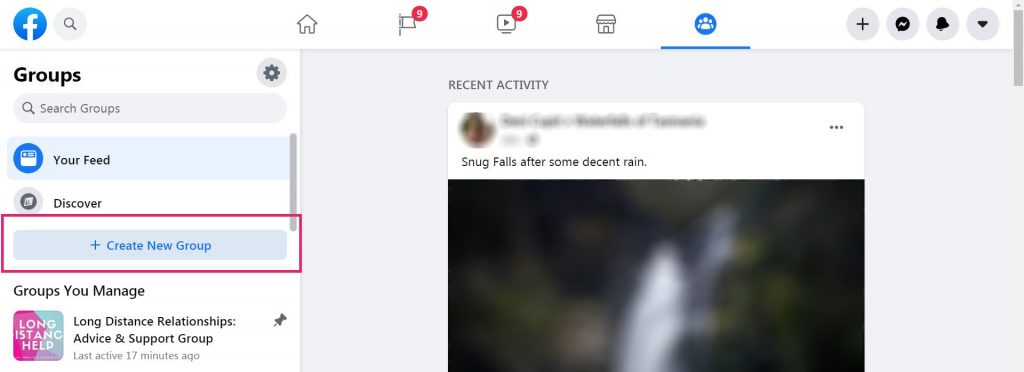
- Then click on the button to “+ Create New Group” in the left hand sidebar of the group’s Discovery feed.
How to Create a Facebook group as your page
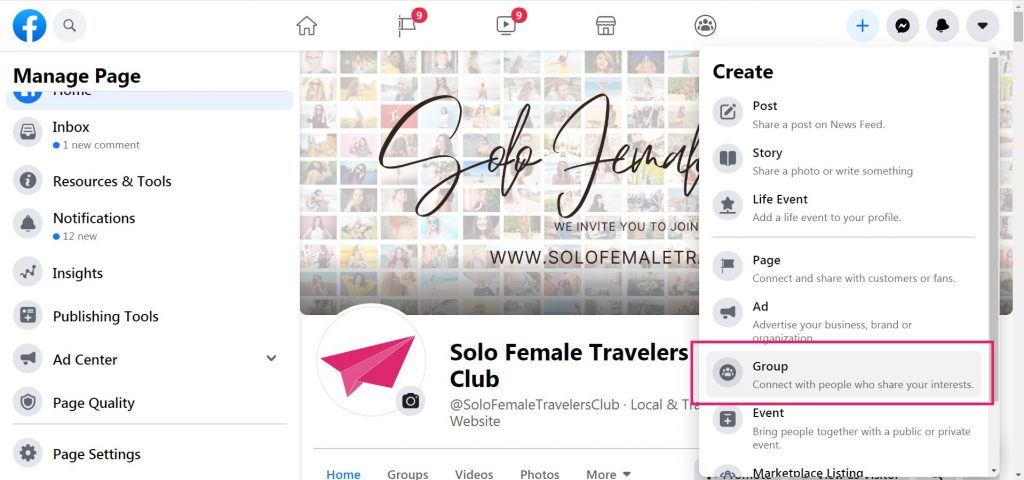
- To create a Facebook group as your page, click on the + symbol in the top right corner of the screen. This is the Create menu, and you can choose Group from the dropdown options.
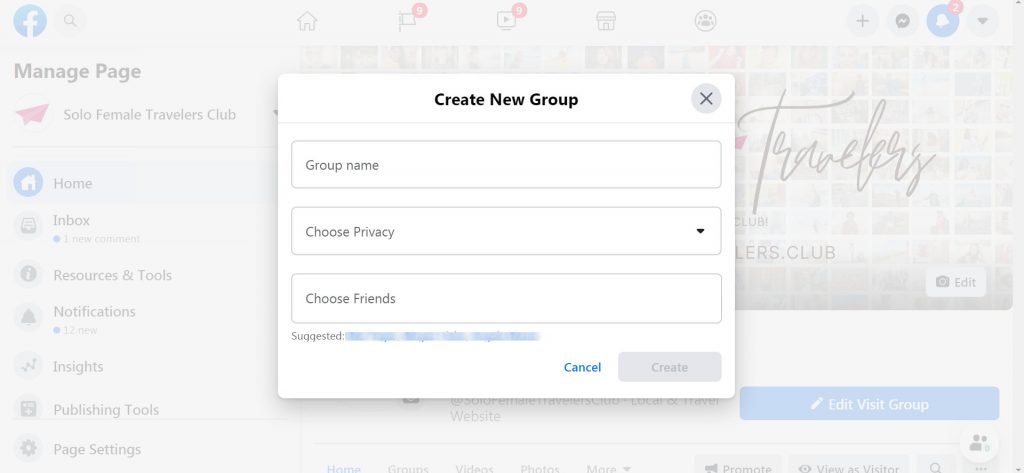
At this point, the process streamlines to become the same, and regardless of whether you’re creating a group from your personal profile or from your page, you’ll get the exact same screen which prompts you to:
- Choose a group name.
- Choose your privacy settings.
- Invite your friends to join.
Pro tip: When you create a group as a page it automatically links it under the Groups section of your Facebook Page. This is a section which lists all your public groups for your followers to see. Even if you deactivate a group, it remains linked within this space until you manually go in and unlink it. Don’t forget, and leave inactive groups linked on your page!
Learn Our Secrets to Growing 15 Groups to 100k + Members! Get Our E-Book!
400 + Actionable Pages
390 + How-to Screenshots
32 Proven Unpaid Growth Strategies
My group has exploded using your strategies. A competing group actually asked me how I was growing so quickly!!

The Three Things You Need to Create a Facebook Group
Choosing a group name
The first field to fill in when creating a Facebook Group is your group name. Choosing a name for your Facebook Group is something you should think about carefully because it is critical to ensuring your group gets found, gets recommended by Facebook and attracts the right kind of members.
Beyond making your group’s name searchable, you also need to remember that your group name is the first thing people use to form an impression of both your group and your business, and a poorly chosen name which doesn’t catch people’s attention can undermine the work you’re putting into growth.
In our article on how to choose the right Facebook Group name, we go over the main decisions factors when choosing a Facebook Group name and ways to optimize it so that you unlock Facebook’s algorithm potential and gets your group to the top of the search results.
Choosing your group privacy
Once you’ve chosen your group’s name you’ll then need to choose its privacy setting.
There are two privacy options for Facebook Groups: public and private (formerly public and closed groups). If you’re creating a private group, you can adjust the settings to then have it visible or hidden from Facebook search (formerly called secret groups).
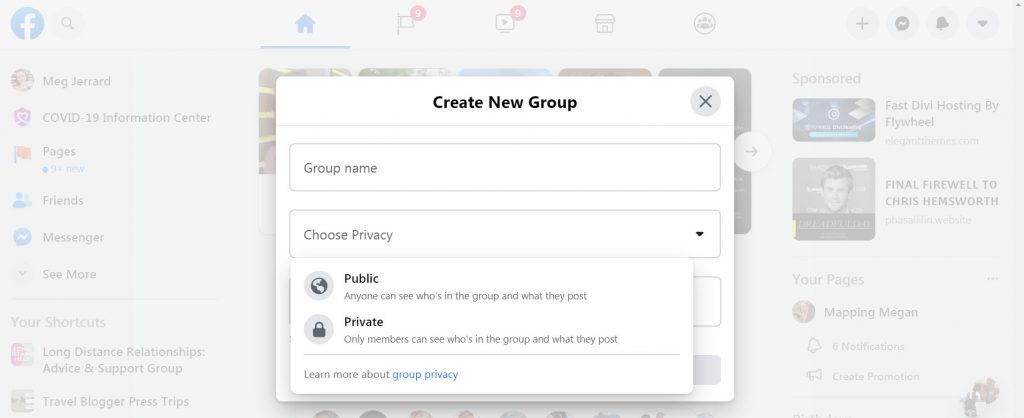
A public group is completely open and accessible to everyone on Facebook; all content is visible without first having to join (anyone can see who’s in the group and what they post) and Facebook will start to show the content of a public group even outside of Facebook.
That means members don’t have to ask for admission to read the content and, in the future, admins will be able to choose if they want to allow non-members to contribute to discussions (a feature announced at the 2020 Facebook Communities Summit).
A private group is one where only current members can see the content, and membership must be requested and approved by an admin or moderator before a user is able to join. Invited members to a private group can see a preview of content for 30 days after they have been invited, though they won’t have full access until they join.
It’s important to really think about which settings will be best for the purpose of your group. While public groups can change to private after they’ve been created, you cannot change a private group to public.
This rule is there to protect the privacy of group members who joined a private group, so if you’re creating a private group, this is a permanent decision.
Pro tip: If you decide to change a public group to private, all members will be notified and all other admins will have 3 days to reverse the change.
There are advantages to both group types, the biggest case for a public group being that it’s more accessible, which could make it easier and quicker for your membership to grow. Facebook’s recent shift to promote public groups also makes us think they will heavily push for engagement and discoverability and start showing ads in them.
On the other hand, the fact that all content is public means that conversations tend to stay at a more superficial level and users will be more reluctant to engage in deeper discussions. Private Facebook Groups tend to foster stronger connections and a more loyal community, which can often be far more valuable despite potentially slower growth.
Below is a table comparing both private and public groups and their features.
| Public groups | Private groups |
|---|---|
| Anybody can read the content. | Content is exclusive to members you personally approve. |
| To post or engage you need to be a member, but admins will soon be able to allow non-members to contribute to discussions without having to join. | To post or engage you need to be a member. |
| Tend to grow faster because the conversations are visible outside the group, though this could backfire if the content is of low quality and members can see that from the onset. Public groups will soon be searchable outside of Facebook. | Tend to grow slower because they are harder to find and you don’t know what is behind the curtain, though this can be used to your advantage to attract members to a sense of exclusivity. |
| Members might be more cautious to engage in certain types of discussions because their posts are visible to everyone, even those outside the group. | Exclusivity fosters a more engaged community that is more willing to share personal experiences. Conversations can be more private. |
Both private and public groups allow you to control the membership and turn post approval on so the main difference between the two is whether the conversations stay within the group or are visible to everyone regardless of membership.
When deciding if you want your group to be private or public, think about what your members would want. The topic of your group may make this decision easy for you.
For instance, with our group for Solo Female Travelers, this is a female only group, and we don’t admit those who identify as male. As such, a public group would not suit the topic. If the group became public, our female members wouldn’t feel comfortable posting anymore, and the group would cease to have a purpose.
Similarly, our group for Long Distance Relationships is one where members discuss highly personal, sensitive topics.
One of the biggest concerns members have when they join is whether their friends and family (or their partner) will be able to see what they post, so it’s a no brainer for us that this group has to be private (this type of group is also far more prone to attracting those who prey on vulnerable people, so taking control over the membership is absolutely essential).
However, if your group is about humor (as many of the largest Facebook groups are) or about sharing contests and giveaway opportunities, a public group would be more conducive as you want posts to reach as many people as possible and care less about whether there is discussion or conversations within the group and whether users need to be a member to participate.
Make the call based on the nature of the group, and the nature of the members who would be joining.
If you believe your goals would be best served by offering members an exclusive space that allows them the security of expressing themselves safely, you should opt for a private group. Especially if monetization is a future goal, creating a barrier to entry means that you can create a community around only those who are genuinely interested, which means a high level of engagement, and higher levels of trust (which is essential for converting sales).
Don’t underestimate the power of making people feel like they’re part of an exclusive, special club; having a private group is quite often the key to improving the quality of a community.
Hidden vs visible for private groups
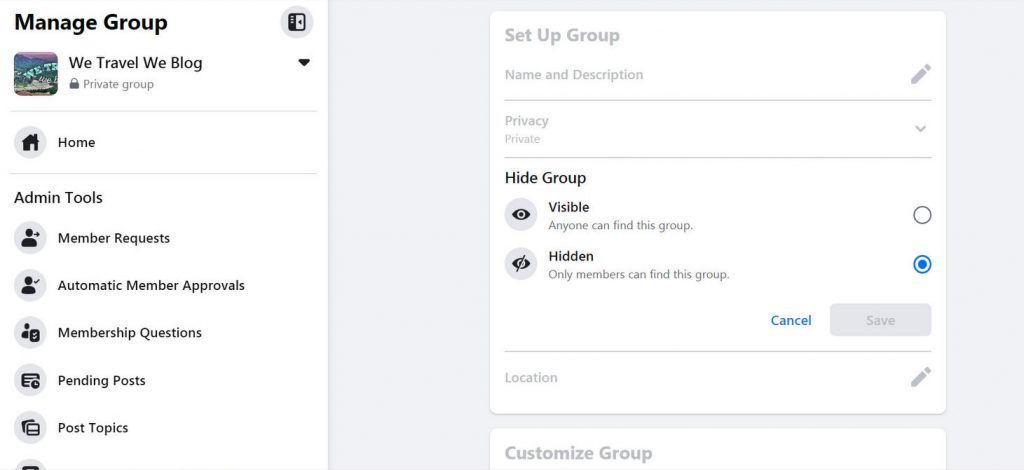
If you’ve chosen to create a private group, you’ll then have the additional option of making it visible or hidden. If you make it visible, this means Facebook users will be able to find it via Facebook search and apply to join (though not see any content until they are accepted as a member).
If you make your private group hidden (formerly this was called a Secret group), this means that only members of the group can find it, and new members can only be added at the invite of current members, admins, or moderators. Nobody outside the group will be aware of its existence, and nobody can apply to join.
Read this article to learn what a Secret Facebook Group is, what it means when your group is set to hidden, and in which instances it would make sense to have a Secret Facebook Group. We’ll also go through how to create one.
Invite at least one friend
Once you have your group name and privacy settings down, you’ll need to invite at least one friend to join the group before the Create button becomes clickable.
We recommend inviting a close friend who you can tell in advance that you’re creating a new group, but holding off on inviting anyone else until you’ve completed the rest of your set-up.
If you invite hundreds of people to join before you’ve actually set up your group; ie before you have created a cover image, written your group description, and posted initial content, it paints a pretty sad picture of the group you’ve invited them to join and it doesn’t tell them much about what they can expect to find inside. As such, chances are they will not accept your invitation.
First impressions count, and you want to excite people the minute they arrive, otherwise they feel like they’ve arrived at the party early, and that’s always awkward!
Continue Setting Up Your Group
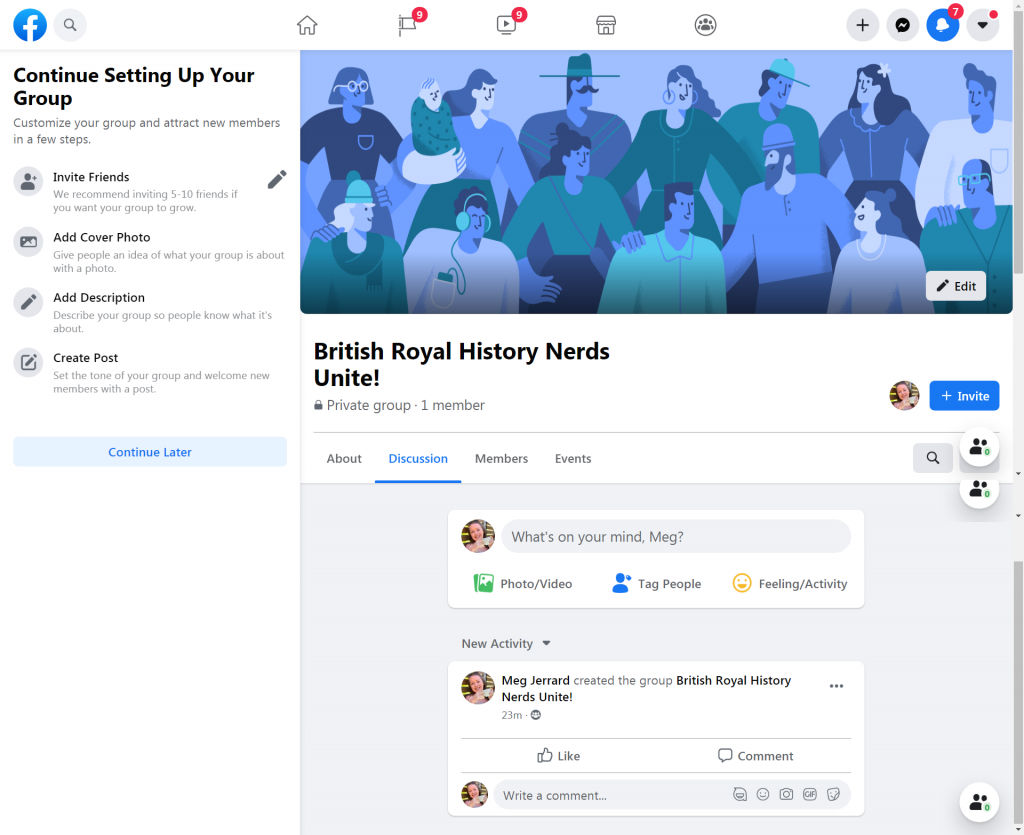
Once you’ve hit the blue Create button, the next steps will appear on the left-hand side, and you’ll first be prompted to invite friends. Once again, we recommend you hold off on this until you have added a cover photo, written a description, and created your first post.
You can skip all of these steps by hitting Continue Later to explore the rest of the admin tools before jumping in. Within your admin tools you’ll have the ability to customize the group experience, like choosing a Facebook Group type (there are 7 to choose from), creating Group Rules (read this post for our recommendations), setting membership questions etc.
So while there’s still a bit of set up to go at this point, for all intents and purposes, congrats! You have created a Facebook Group!
Now that you’ve created your group, you can find all our articles on optimizing each of your settings in our Facebook Group Knowledge Hub.
Learn Our Secrets to Growing 15 Groups to 100k + Members! Get Our E-Book!
400 + Actionable Pages
390 + How-to Screenshots
32 Proven Unpaid Growth Strategies
My group has exploded using your strategies. A competing group actually asked me how I was growing so quickly!!
Frequently Asked Questions about how to create a Facebook Group
Yes, you can create a Facebook group as a Page, or from your personal profile. If you create a group from your Facebook Page, your Facebook Page will be the original Creator. This can be beneficial if you are a multi-team business, because it means the group will be controlled by whoever controls the page. You can then add your personal profile to the group as a backup administrator. If you create a group from your personal profile, you personally will be the original Creator, and you can then proceed to link your page as a secondary administrator.
To create a group from your personal profile click on the groups shortcut in the left hand sidebar of Facebook. Then click on the button to “+ Create New Group” in the left hand sidebar of the group’s Discovery feed.
To create a Facebook group as your page, click on the + symbol in the top right corner of the screen. This is the Create menu, and you can choose Group from the dropdown options.
You’ll need to choose a group name, choose your privacy settings, and invite at least one friend to join when creating a new Facebook Group.