

Facebook Live is a feature that allows you to broadcast in real time to your personal profile, your Facebook group, or a page feed. And we absolutely love this feature for our groups.
When it comes to engagement, videos perform better on Facebook than images do, and Live video works really well in the context of a group because of the more intimate and personal context; they are a great way to connect with your members in a more organic and authentic way, literally in the moment.
But if you’re planning to stream live to any of your social media networks, or even to your website, we highly recommend using a third party live streaming tool. These tools provide a lot of flexibility, useful features to make the most of your live stream, and many ways to engage and interact with your audience beyond what’s available through streaming via Facebook natively.
This article is a review of Streamyard, a key Facebook admin tool and our preferred Facebook live streaming tool. It’s one we strongly recommend if you are serious about making the most of your live broadcasts.
Streamyard is one of the most common live streaming tools, and after having tried and tested a few different tools, we genuinely believe Streamyard to be the best. It is the most affordable, flexible and user friendly, and it comes with more features than any other.
Streamyard is an invaluable tool to make the most of your live streams, and with both free and paid plans, it’s a no-brainer for every Community Leader / group. This article is our review of the tool, and guide for how to use it.
Jump to: What is Streamyard I How to sign up I How to go live I Streamyard features I Final verdict
What is streamyard?
Streamyard is a third party live streaming tool that allows you to go live on your favorite social media networks. You simply sign up, connect your social media platforms, and can simultaneously go live to more than one destination at the same time (examples of a destination being your Facebook Page, your Facebook Group, your YouTube channel etc).
Streamyard does not require a software download like Zoom and allows you to share your screen, invite guests (who also don’t need to download any software) and can natively connect with Facebook, Twitch, Periscope, YouTube and LinkedIn. It also provides you with a stream key and RTMP which you can use to stream to other destinations they do not natively integrate with.
We have been using Streamyard for almost a year and think it continues to be the best live streaming tool for Facebook and other social media networks there is. Read more to find out all the details in this Streamyard review.
streamyard review: Best third party Facebook live streaming tool
There are many live streaming services you can use to go live on your social media channels including your Facebook page, group and YouTube. They all appear to offer similar features and it’s initially hard to compare; until you start using them and realize their limitations.
We are convinced that Streamyard is the best live streaming tool because of its user friendliness, its features and its price. Even their free plan comes with up to 20h of live streaming a month, up to 6 guests on screen at the same time, the option to schedule a broadcast and the chance to share your screen. All of this for free.
We use their annual Basic paid plan which costs $20 a month and allows us to replace their branding with ours, stream to more destinations at the same time (eg. the page and group) and download the sessions as video files for re-purposing into YouTube videos.
Here is a comparison table of the three most popular Facebook live streaming third party services: eCamm, Be.Live and Streamyard, so you can see why Streamyard is the best live streaming tool for Facebook.
| Streamyard – Basic plan | Be.Live – Standard plan | eCamm – Standard plan | |
|---|---|---|---|
| Price ($) paying monthly | $24 paid monthly, $20 annually | $29.99 paid monthly, $24,99 annually | $15 paid monthly, $13 paid annually |
| Free trial | 7 day money back guarantee | 14 days free trial | 14 days free trial |
| Technical specs | Mac and PC access, cloud-based service, guests access via a link | Mac and PC access, cloud-based service, guests access via a link | Only Mac, local software, guests on Skype |
| Destinations | Facebook group, Facebook page, Twitch, Periscope, LinkedIn, YouTube | Facebook group, Facebook page, YouTube | Facebook group, Facebook page, Twitch, Periscope, LinkedIn, YouTube, Switchboard, Restream.io |
| No. of streaming destinations | 4 | 2 | 1. Integration with Switchboard or restream.io for multi-destination stream (extra $13-$39 a month) |
| Remove watermark | Yes | Yes | Yes |
| Own logo | Yes | Yes | Yes |
| Download recordings | Yes | Yes | Yes |
| No. of participants | 10 | 4 | 9 cameras or 5 Skype guests |
| Screen share | Yes | Yes | Yes |
| Custom RTMP destination | Yes | No | Yes |
| Mobile access | Both guests & the host can join via mobile or desktop. | Guests can join via mobile, host needs to be on desktop | Host on laptop, guest on Skype |
| No. show hours | Unlimited | Unlimited | Unlimited |
| Length of individual show | 4h | 8h | Unlimited |
| Other | Polls and questions. Ability to show audience comments on screen. No password, so no risk of hacking. Embedding a live video in your website using YouTube. | Ability to show audience comments on screen. | Ability to connect other cameras via HDMI. |
As you can see from the above comparison table, Streamyard has more features and costs less than the other options available and this is why we find it a no-brainer to use them.
We also find they have quick support, and are constantly improving the service, having added several new features since we joined. Their interface is fool-proof and very easy to use, so you can intuitively get started straightaway. If inviting guests to join the live stream with you, all they need to login is a link you provide – it’s very simple for even the most technologically challenged (no downloads)!
If you’re considering live video to your Facebook pages, groups, YouTube channels or all of the above, signup for Streamyard. You won’t regret it!
Now for how to use the platform:
How to sign up for Streamyard
The first thing you need to do to start using Streamyard (<- use this link to get $10 off your first month) is to sign up for it.
For this, all you need is an email address; no username, no password. Just enter your email and they’ll send you a login code to validate your registration.
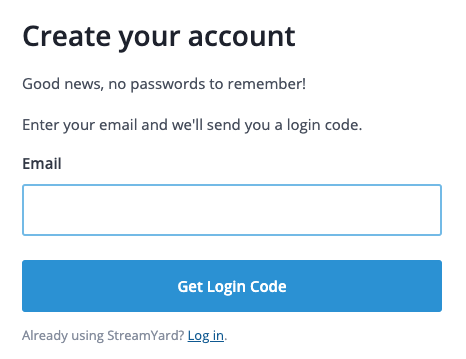

Streamyard has one of the simplest registration processes we have ever seen, and getting started is frictionless. No need to enter names, usernames, addresses, details, credit card numbers – nothing. Just an email address will do. They say this is to minimize their risks, as they don’t wish to hold on to any private or sensitive data. We’re all for that!
Every time you log out and need to log in again, a new code will be sent via email. If you simply close the window, you’ll still be logged in when you re-open it (unless you clear your cache or cookies). If another member of your team needs to login, they will get a code, which will be sent to the registered email address, and they will remain logged in until they log out.
After signing-up you will be automatically placed in their free plan. If you used our link and are planning to upgrade to the Basic plan, you can get $10 off when you do.
Because their login process is so simplified, there are a few things to bear in mind:
- You need to sign-up to Streamyard with an email address but because it works with a login code, you can use a shared company email address for this or even your boss’ or colleague’s email address.
- You can share a Streamyard account among more than one person from your organization or another Facebook Group admin, as long as you give them a login code the first time they login, they will have access to the account. After you have signed-in once, you will remain signed-in until you log out without the need to enter login codes again.
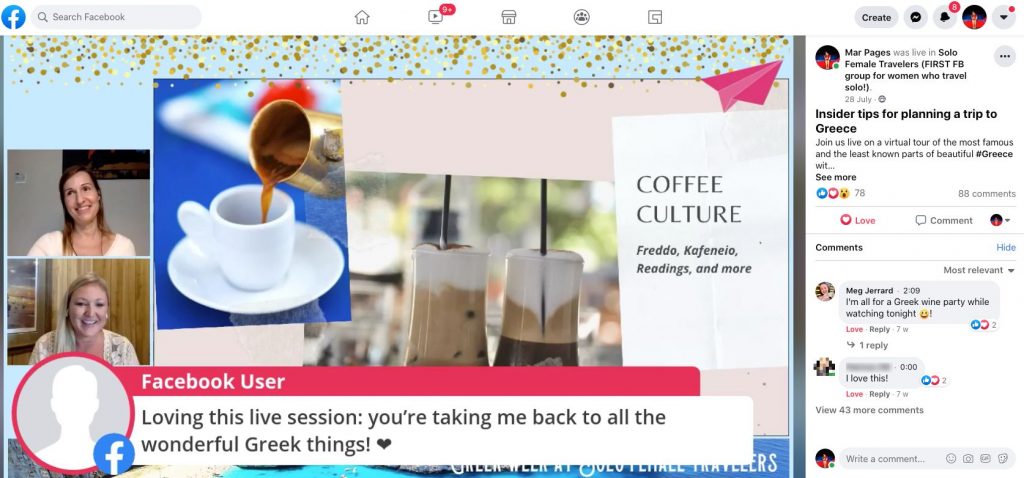
- When you connect Streamyard to your Facebook Group or page, you need to do that with your personal profile; you cannot go live to your group as a page. Because Streamyard will ask you to authenticate the access, you need to use a Facebook profile you have the password for, usually, your own.
- The Facebook profile used to initially connect Streamyard to Facebook is the one that will appear as going live, even if the account is shared with other admins. For example, when we go live on Solo Female Travelers or Online Group Success it is always Mar who goes live even if the session is actually hosted by Meg. This is because we connected Streamyard to the group and page using Mar’s profile and credentials, however Meg goes live via Mar’s account using her login code.
- Only the person whose Facebook profile is used to connect to Streamyard will be able to edit the posts created for the Live videos in each social media destination (not the business page or another admin for the same account).
- If you want to alternate between more than one Facebook profile using the same Streamyard account, you will have to disconnect Streamyard from the Facebook Group and reconnect it with the new profile. There are no adverse effects when doing that, the only aspect which will be impacted are the previously scheduled broadcasts, which will fail to go live when the profile linked is not the same as the profile of the scheduled broadcast. However, you should be able to fix that after clicking to Go Live by editing the details and manually going live on the destination which failed. Alternatively, only schedule the post as the profile who will go live.
Note: The above considerations apply to all consumer grade streaming applications, not just Streamyard, but also Be.Live, etc. These are limitations imposed by Facebook on third party live video streaming services.
Choosing the right plan from Streamyard
These are the 3 Streamyard plans offered and their respective features.
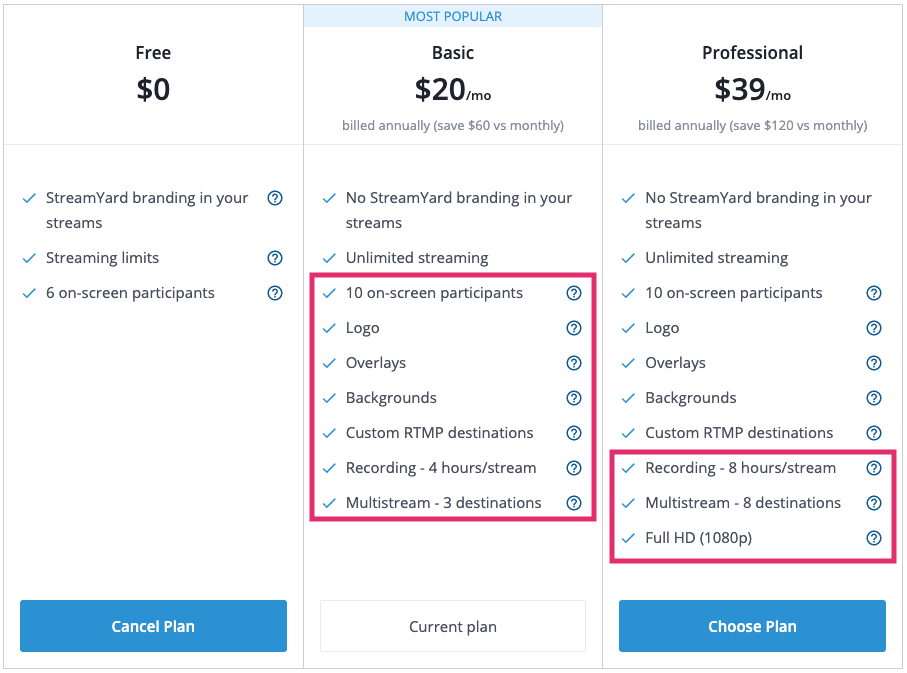
The free plan has a maximum of 20h of streaming a month, allows you to stream to one destination only and to invite 6 other participants to your session (if you are sharing your screen, that counts as one participant).
We highly recommend the Basic plan because it removes Streamyard’s branding, it gives you many extra features we think are well worth it (like streaming to more than one destination at the same time, e.g. group and page) and it records the session and allows you to download the footage so you can re-purpose the content and edit it for YouTube and other mediums.
To us, just the recording and branding part justify the upgrade from the free plan, but all the additional features are also fantastic.
For example, you can add overlays and backgrounds, invite up to 10 guests on screen, and include an intro video at the beginning of your session for a truly professionally-looking live stream. You can also download the footage at 720 px resolution which is good enough for any social media platform (including YouTube).
Pro tip: If you want to download the recording in 1080 px quality, you can upgrade to the Professional plan and that option will become available.
If you’re not sure whether upgrading to a paid plan makes sense for you, you can try the Basic monthly plan for one month and downgrade after 30 days to test it out. This is how we got started, and we ultimately decided to upgrade to the annual Basic plan because the additional features were essential for us.
Use our link by clicking on the button below and you will only pay $15 to use Streamyard for one month.
Pro tip: If you’re using the free plan and want to download the session from a Facebook group as a file, you can Google ways to do this the unofficial way. Facebook protects users’ privacy in private groups, so we’ve found this method sometimes works and sometimes doesn’t. Even if you succeed, the quality of live streams you download this way will be much lower (320 px instead of 720 px or 1080 px when you download it from Streamyard on the paid plans).
Lastly, if your business is present across many social networks, it pays to upgrade to the Professional plan which allows you to live stream to 8 destinations concurrently. This is particularly interesting if you want to broadcast to YouTube, your Facebook Group and Page and your LinkedIn page, for example.
How to connect your social media profiles to Streamyard
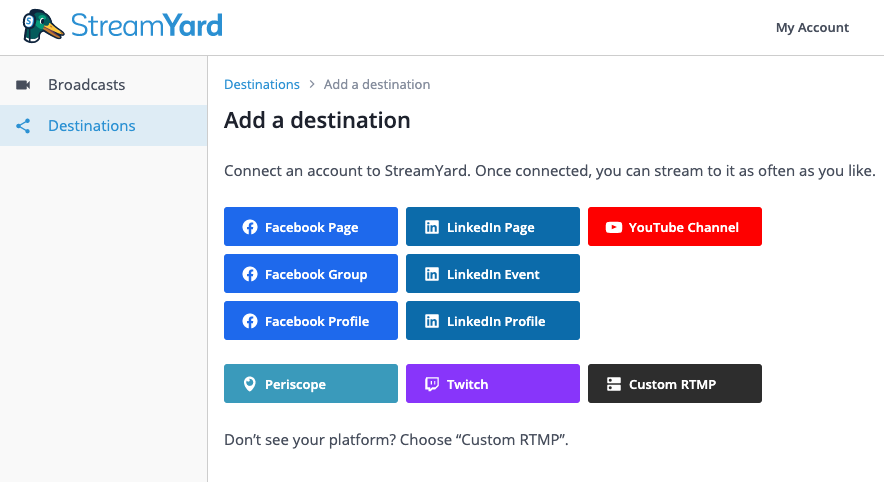
After you sign-up to Streamyard, you have to connect each social media destination you will be streaming to from your Streamyard account.
Streamyard gives you several destination options including Facebook, LinkedIn, YouTube, Periscope and Twitch. You can connect more than one destination of the same kind, e.g. two Facebook groups.
Besides the obvious social media connections, one of the most interesting destinations Streamyard allows you to stream to is RTMP. This will allow you to go live on any other destination no listed on Streamyard’s list of destination options, for example, on your website or on Vimeo, by simply using the RTMP URL and stream key.
Pro tip: If you want to stream to an unlimited number of destinations, you can connect Streamyard to Switchboard.live and be able to stream wherever your audience may be.
To connect each destination to Streamyard you will need personal access to each as an admin. Follow the instructions for each destination to complete the process.
Pro tip: If you plan to go live on LinkedIn you will have to ask for approval as this is a beta service from LinkedIn. Apply here.
Learn Our Secrets to Growing 15 Groups to 100k + Members! Get Our E-Book!
400 + Actionable Pages
390 + How-to Screenshots
32 Proven Unpaid Growth Strategies
My group has exploded using your strategies. A competing group actually asked me how I was growing so quickly!!

How to go live with Streamyard
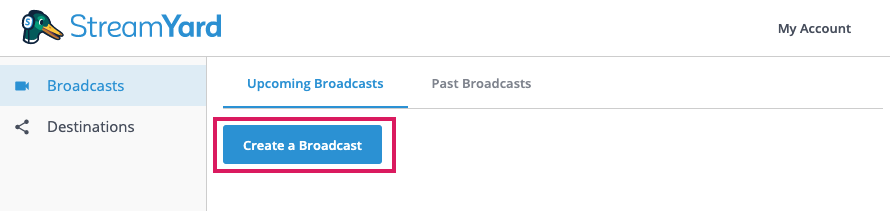
Once your destinations are connected, you’re ready to either schedule a broadcast for a date within the next 7 days (max allowed by Facebook) or go live directly to your chosen destination(s). In both cases, go to Broadcasts and click on Create Broadcast.
As soon as you do that, the broadcast dialog box will open as below.

To schedule a live session with Streamyard follow this process:
- First pick the destinations you want to broadcast to by clicking on the icon at the top from the available options. On the free plan you can only pick one, on the Basic you can select 3 and on the Professional up to 8. Then enter a title and description of the session. Remember this is what your members will see so it needs to be appealing. You can edit this later in the destination directly, for example to tag a member or page.
- Tick the box for Schedule for later and the options below will appear. Pick a time for your session and bear in mind that Facebook only allows you to schedule up to 7 days in advance and that if you do not go live within the first 10 minutes after the scheduled time, the broadcast will be cancelled. To avoid that happening, make sure to test all technical aspects with your guests (if applicable) before the session.
- Scheduling a session allows you to add a feature image that will be published with your post. The image needs to be 1280 x 720 pixels and it should be appealing.
- Finally, if you are going live in more than one destination, you can customize your title and description for each in the next box and click Create broadcast to schedule it (i.e. your description for Linkedin can be different to the description for your group or page on Facebook – which can also be different from each other).
If you want to go Live directly (i.e. without scheduling a broadcast in advance), the steps are very similar:
- First pick the destinations you want to broadcast to by clicking on the icon at the top from the available options. On the free plan you can only pick one, on the Basic you can select 3 and on the Professional up to 8. Then enter a title and description of the session. Remember this is what your members will see so it needs to be appealing. You can edit this later in the destination directly, for example to tag a member or page.
- If you are going live to more than one destination at the same time, you can customize your title and description for each in the next box and click Create broadcast to enter the studio.
streamyard features
Regardless of whether you go live directly or via a scheduled broadcast, about half an hour before the time you should enter the Broadcast studio to get it all ready.
To do this, either go to your Upcoming broadcasts (for scheduled broadcasts) and click to Enter Studio. You will be taken there directly from the set-up if you are going live directly.
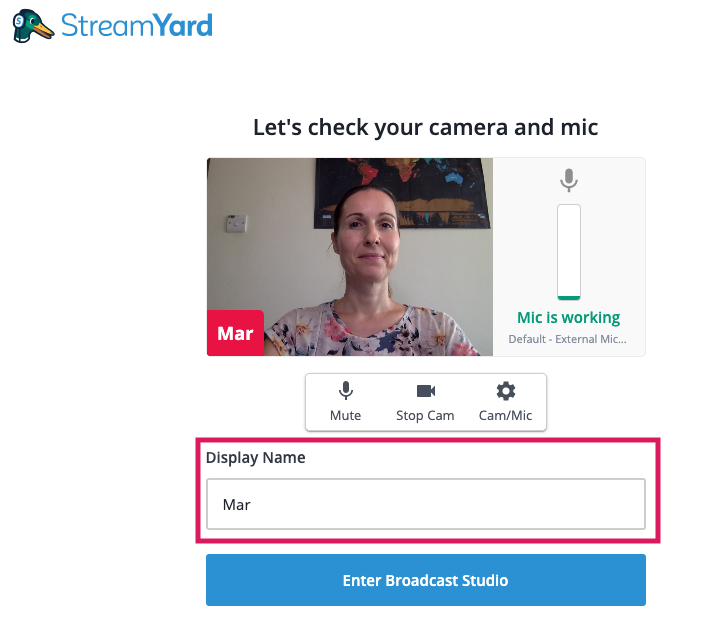
Pick a display name (which will appear below your screen throughout the live video), and check that your camera and microphone are working fine. Unless you are sure there is no background noise where you are, we recommend using headsets and microphones. Then enter the studio.
Guest speaker view
When a guest speaker receives your invitation to join the stream, they will be prompted with the same welcome message as you when you join a stream and will be asked to check their audio and image and enter a name.
Below is a screenshot of the backstage live producer view for a guest speaker.
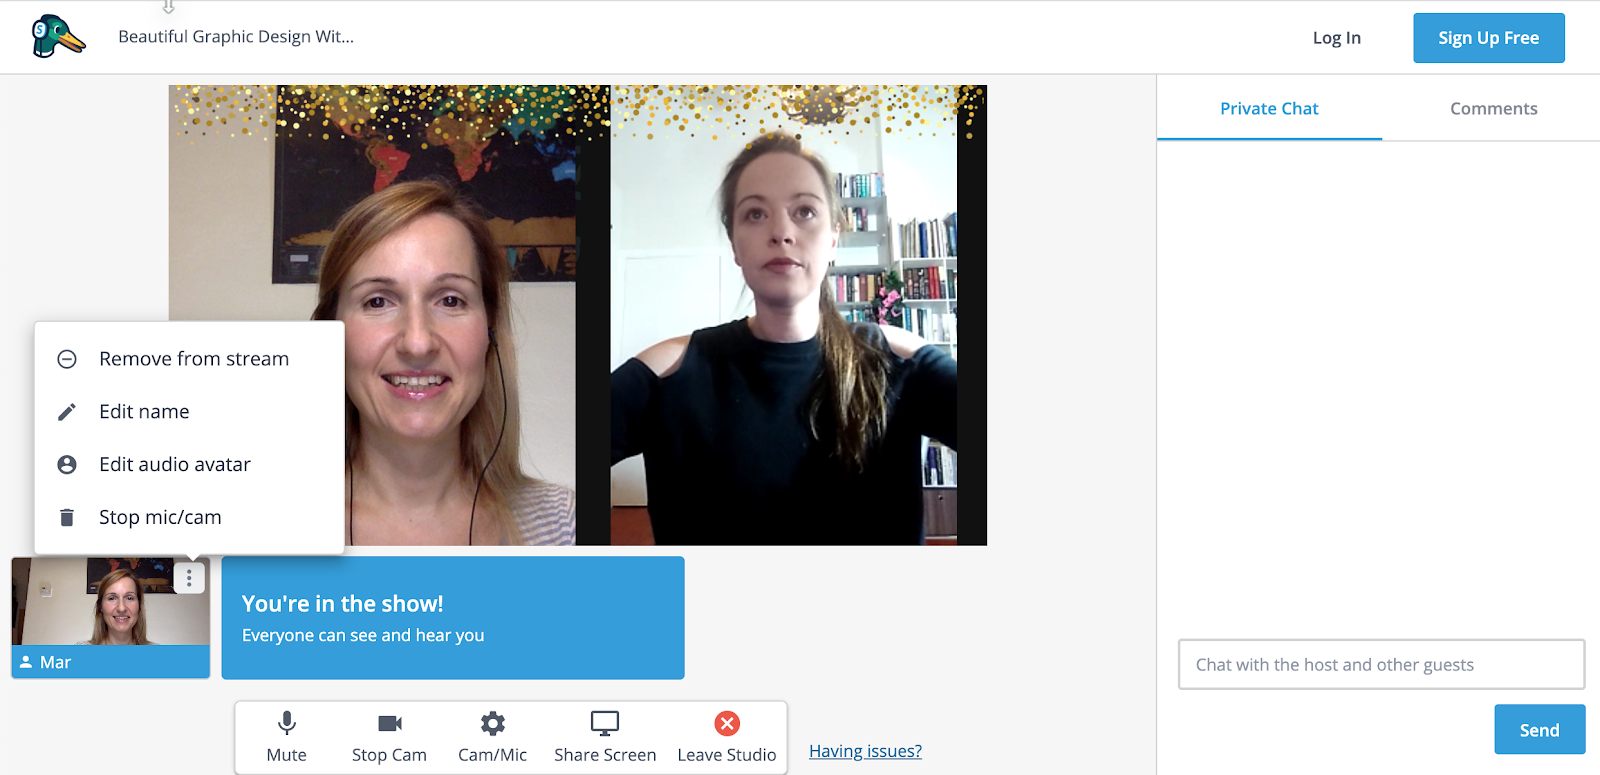
Once they have entered the broadcast, your guest speakers will only see the comments posted in the live stream posts on the various destinations (once you are live or, if pre-scheduled, on the scheduled post), the private messaging window to chat with you and the main screen which is broadcasted.
They will also be able to remove themselves from the stream, stop their microphone or camera or edit their display name. Guests can also share their screen.
Streamyard backstage studio
The Broadcast Studio is your backstage production space from where you can control everything to do with your live stream.
You can change what is displayed on the video, change the layout, add or remove guests, and generally control everything. The only aspects your members will see is what is contained within the middle space of the studio that is the screen.
Streamyard live features
There is a lot going on in the Streamyard backstage studio so let’s look at each of the features using the numbering in the image below.
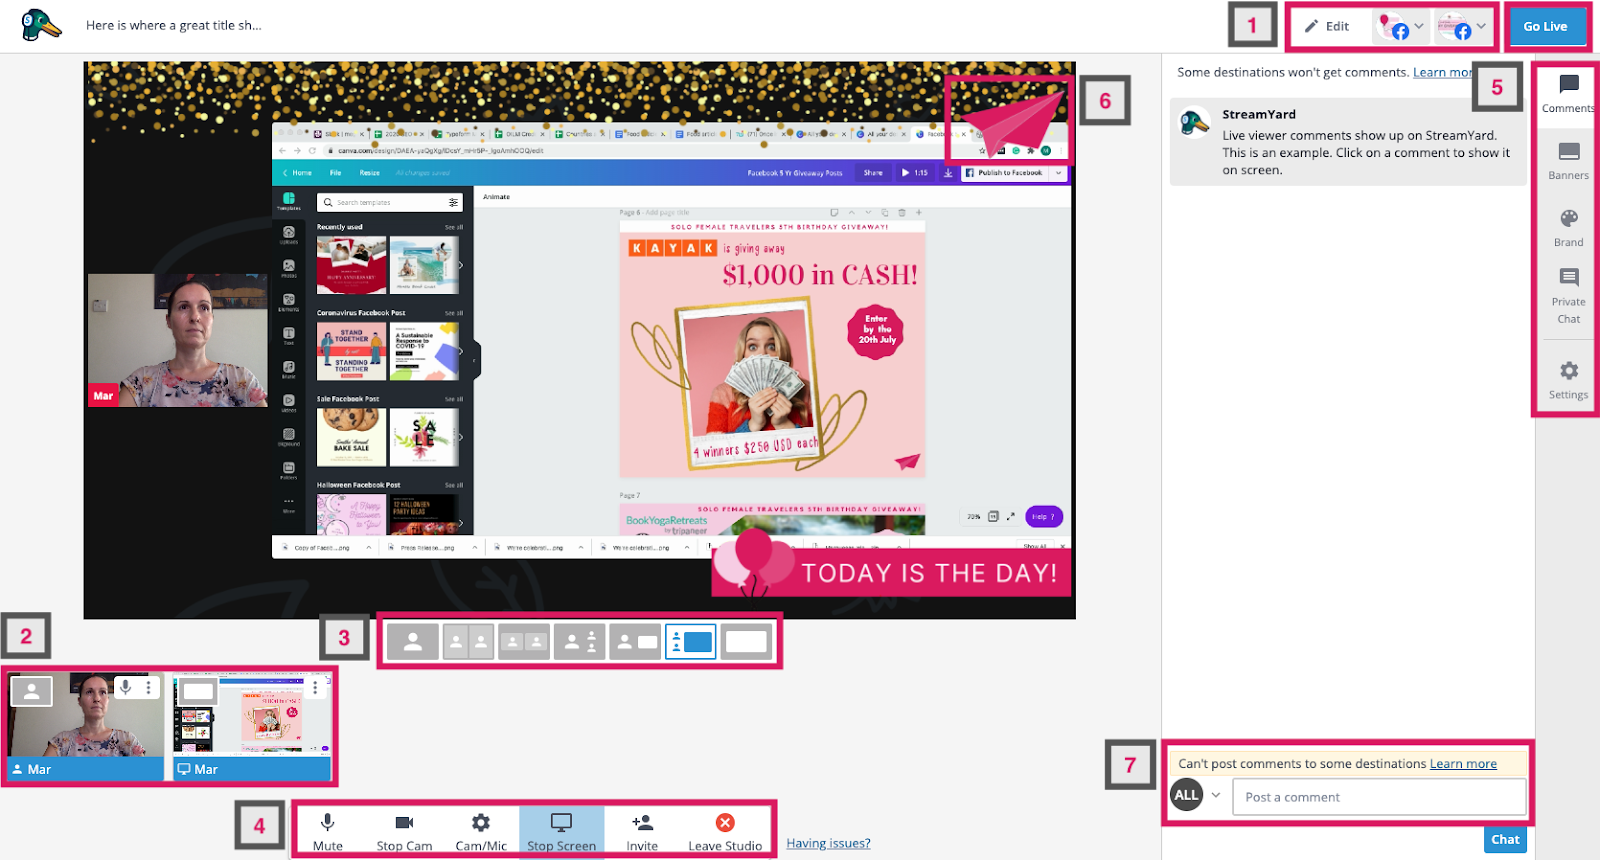
1. Edit the broadcast details (top right)
You can edit the details of your Live session at any time, even after you have gone live, by clicking on the Edit button on the top right. Next to it are the icons of the destinations you are broadcasting to. If your plan allows you to go live in more destinations than the ones chosen, you can add more at any point, even after you have clicked to go Live.
Pro tip: This is a handy feature if you are broadcasting to multiple destinations, but want to give a customized introduction to one specific destination before the live stream broadcasts to your other social media platforms.
2. Control participants (bottom left)
You can control what is being shown on the broadcast via the controls below the screen. You can add and remove participants from the broadcast by clicking on their image. This includes screen shares.
While you can only have the maximum number of on-screen participants that your plan allows, you can have 10 more in waiting. This allows you to get the next guest ready while you are still finalizing the conversation with the current one.
You only have one screen share option, whether it is being shown on screen or not, so if you want to change what tab/window you are sharing without circling through your screens it is best to stop sharing, then start sharing again with the right tab. Via these controls you can also mute yourself, change your screen name or change your avatar when your image is off (see point 4) and you only have the sound on.
3. Change the layout
Streamyard gives you various options for the layout of the live broadcast. The icons here are self-explanatory.

You can have two speakers side by side, three speakers in a 1×2 layout or a speaker and the screen share next to it.
If you plan to show slides, you may want to let them take over the entire screen in some cases so that the text can be better read, especially if you have members who will watch this on mobile (as is often the case).
Streamyard also allows you to reposition the various screens in a broadcast by simply dragging them. You cannot drag the screen share, only the guests, but if you simply drag your and your guest’s position you can change the layout and order.
4. Control panel

The controls at the very bottom of the Studio allow you to Invite guests, Share screen, Switch your camera off, Leave the studio, Mute yourself, Adjust the camera or microphone settings.

You can easily invite guests to your broadcast by sending them a link they can click to join. Like Google Meet, this link is easy and requires no software download like Zoom. Once they join, they will have to pick a screen name and check their camera and microphone before they show up in this part, and you can add them to the stream.
The other handy control you will find here is the screen share, and both host and guest can share their screen (though not at the same time).
Streamyard allows you to share an application window, a Chrome tab or your entire window. You can show a presentation on Canva, a website, or anything that is on your computer.
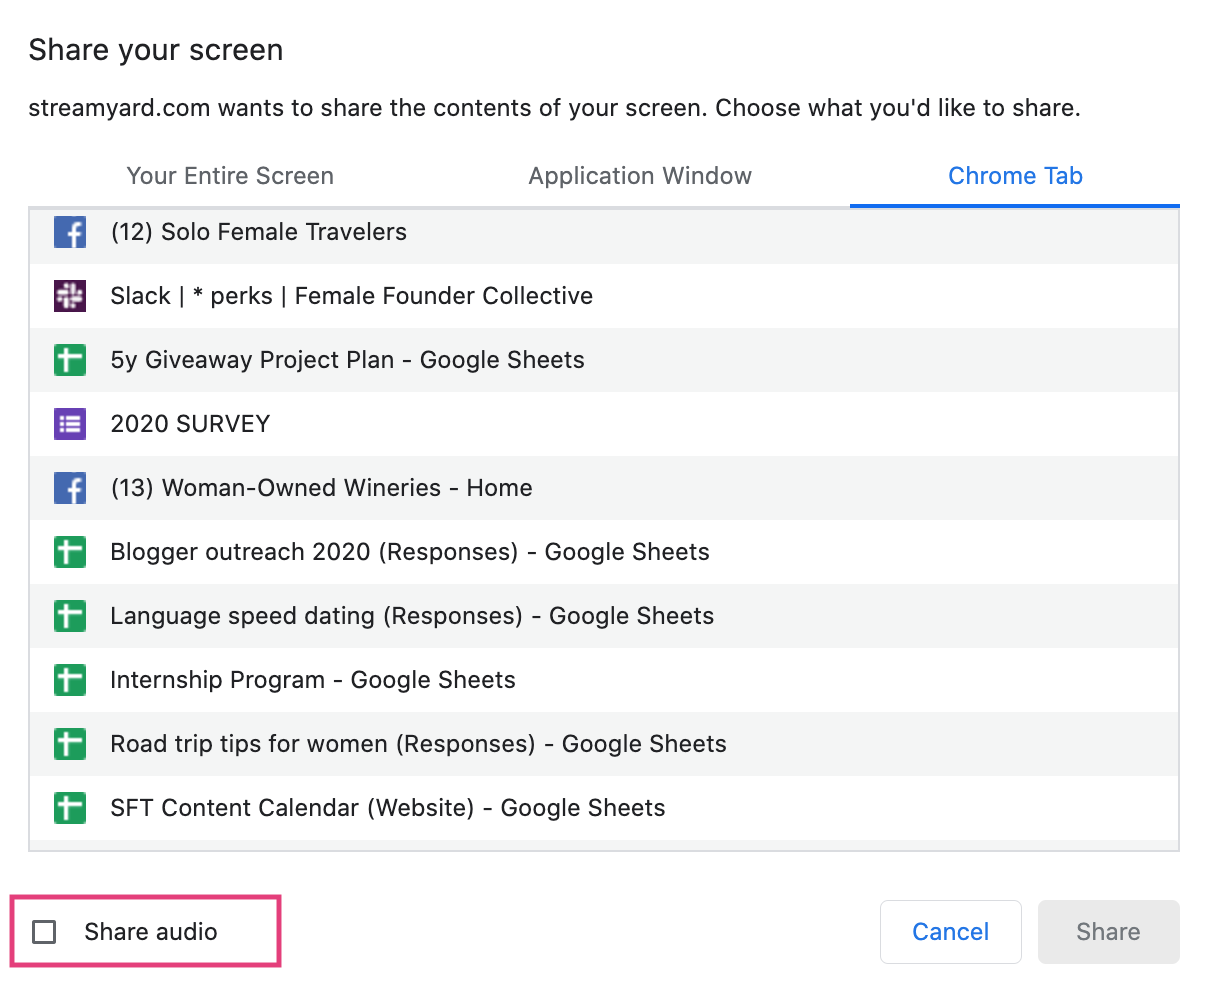
Pro tip: If you want to share the sound as well as the image, select the Chrome Tab, pick the exact tab and click on the checkbox that reads “Share audio”.
Lastly, in this set of controls you will also find the Cam/Mic option which takes you to a set of dialog boxes where you can adjust settings such as the camera or microphone to use. This is where you can also change your backdrop if you have a green screen.
A green screen is literally a piece of green cloth that you can have behind you and which allows Streamyard (and other software) to place a background over. This is the way to mimic Zoom Virtual Backgrounds but more precisely and without the ghost effect Zoom can have.
5. Branding and interactive controls
On the right hand side of the Broadcast Studio you’ll find all the controls that are related to how the broadcast looks and how you interact with your viewers.
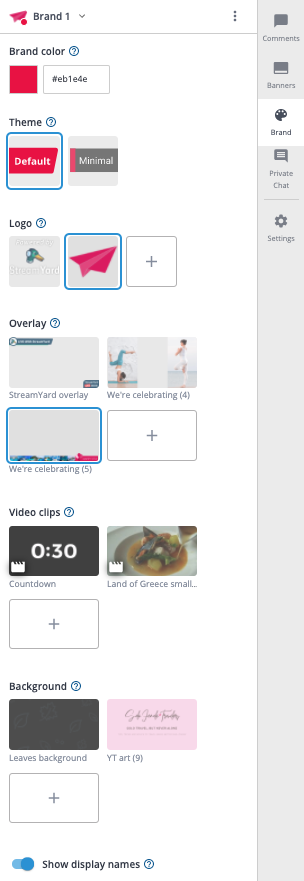
The Brand button will allow you to change the background of your broadcast, the overlays, the logo, the color, the theme, and to upload and play short videos.
If you are on the free plan you will only be able to change the theme and color here, the rest of the options open up in the paid plans.
We find that the overlays and the ability to change the default Streamyard logo for your own gives the entire broadcast a much more professional look, and is reason enough to upgrade to the Basic plan.
Theme refers to the design/style of the banners, the names of the presenters and the comments when shown on screen. Streamyard offers you two options.
A logo will show at the top right side of your stream and will replace the Streamyard duck logo which appears in the free plans. We will talk more about them further down.
An overlay will cover the entire screen and will be placed over everything else, except for a video. You can use Canva to create your overlays but remember to download the PNG file with a transparent background so the live stream is in the middle and the overlays only take the edges of your screen.
We find overlays are good at catching viewers’ attention as they can make your broadcast stand out when members scroll mindlessly through their feed. Anecdotally, we have also noted higher viewing numbers when we have used them smartly.
Streamyard has recently added the option of playing short video clips. These can be up to 5min and 100MB in size and can be played anytime by clicking on them. When the video ends, the clip will disappear and the screen will return to what it was before, or you can stop the clip at any time.
Backgrounds will appear around the individual participant screens. To create a background you can use Canva which is a very powerful, cloud-based graphic design tool. Make sure your background is not too distracting.
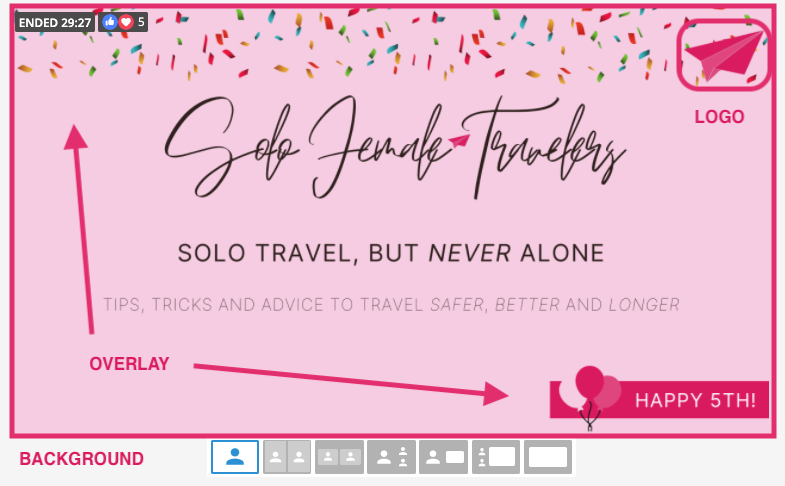
Pro tip: Test your overlay before going live and make sure that the overlay does not cover your logo or any part of the screen share. We suggest placing overlay elements either at the top left or bottom right parts of the screen. On the top right you have your logo and on the bottom left and middle is where the names of the participants appear.
In terms of branding, you can also create banners which will appear at the bottom of the screen when you decide to show them (you can change the color of these banners too).
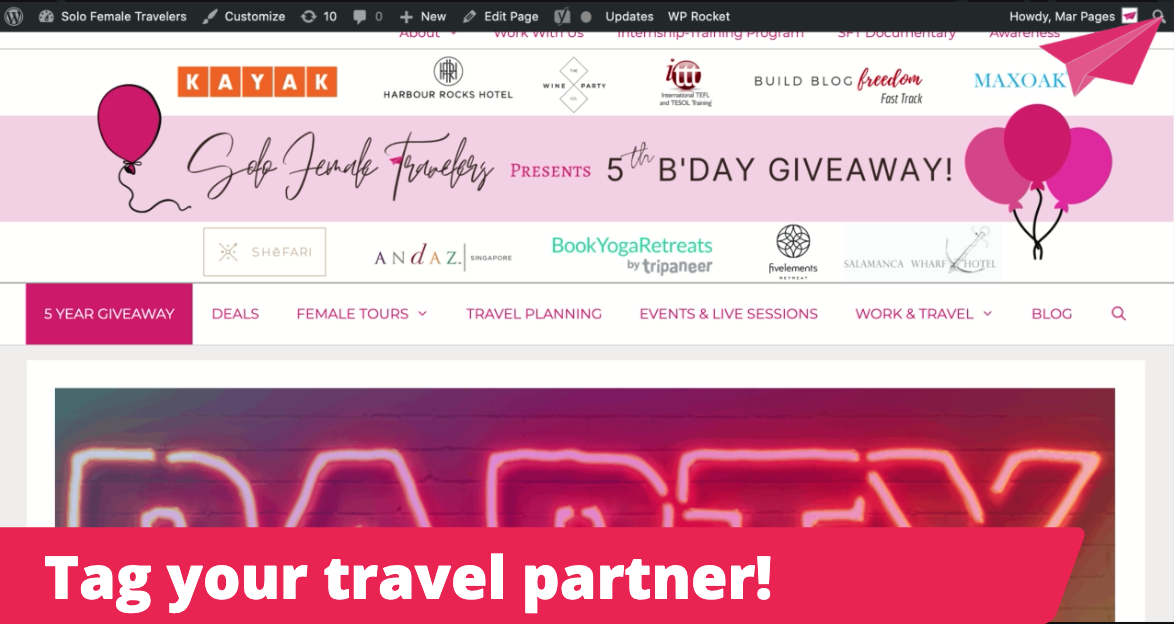
Banners can be useful if you are having a conversation with a guest who does not have supporting slides and you want to keep track of the specific topic being discussed, or to show a call to action like “Like this post” or “Tag your friend”.
As you can see in the image above, banners are shown over overlays so you should choose one or the other or make sure your overlay does not conflict. You can also remove the overlay when you show a banner.
All of the above elements can be added, removed and switched off at any time during a live video by simply clicking on them.
The last option you will find in the control panel on the right is the Private Chat where you can message your guests-in-waiting privately. This is a great feature you can use to keep them up to date if they are waiting to join your live stream.
For example, you might have several guests each of whom come live for 10-15 minutes and are otherwise waiting backstage. When someone is not part of the stream you cannot talk to them, so this Private chat box is the place to keep them updated about when they are coming live or what is happening on the live stream.
6. Logo
If you’re on a paid plan, your logo can be added to the stream on the top right. Unfortunately, one of the few limitations with Streamyard is that you cannot change the size or positioning of the logo and we find that it can be slightly too big. Instead, you can add the logo to your overlay.
As you can see from the previous screenshots, the logo overlaps with the screen share, so if you are sharing slides, you should make sure the logo does not go over any relevant text. The same applies to any overlays.
7. Comments
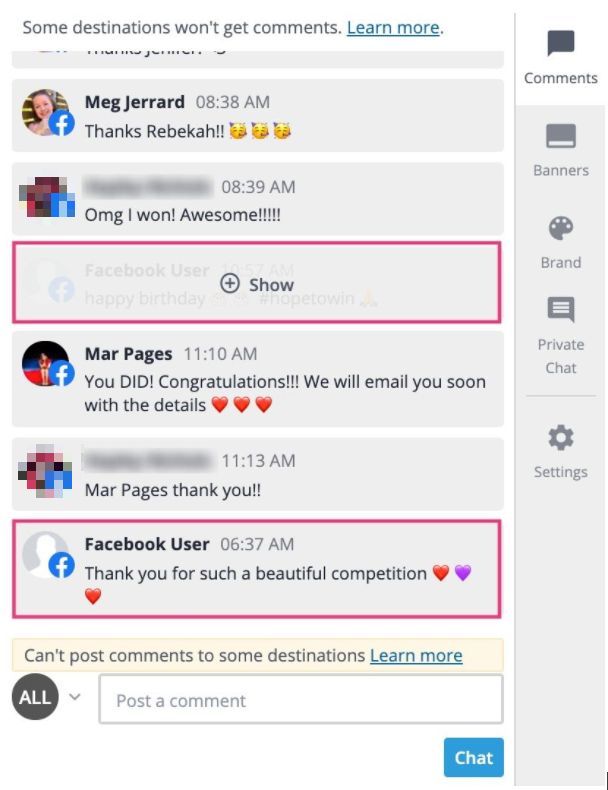
This vertical section on the right is where comments made from any of your destinations will show.
You can see who commented in real time, reply to the comments or click to “Show” so they are displayed over the broadcast screen for your audience to see.
If someone makes a comment that you want to highlight to your audience, you can hover over the comment and click “Show comment” and it will appear on the screen. We have added a screenshot to show how this looks below.
The comments section is a great Streamyard feature for engagement and interactivity. However, there are a few limitations.
Firstly, you will not be able to tell in which platform each comment was made – they will all appear in the comments feed without any indication of having come from Facebook Page vs Facebook Group vs YouTube etc.
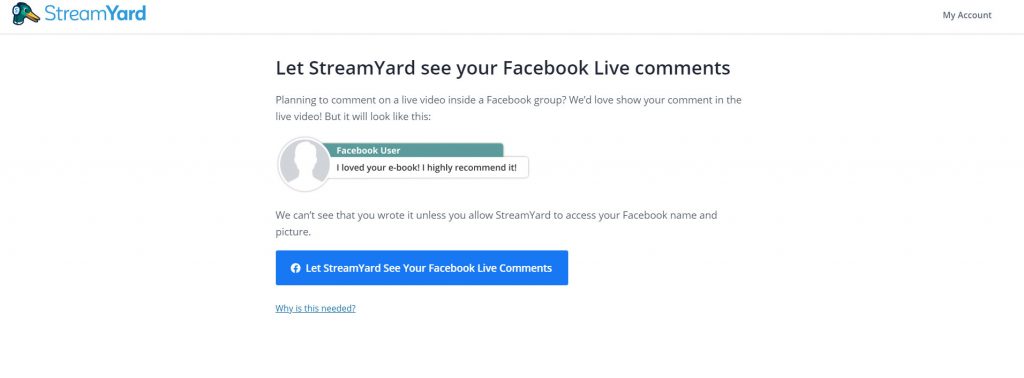
Secondly, Facebook does not share private group user names with third party live streaming tools (not just Streamyard but any third party tool), so comments made within groups will most likely show in Streamyard as Facebook User, unless the user gave Streamyard access.
To get around this limitation, remind your users to accept Streamyard when they comment on your live stream for the first time so that their names appear. To do this they need to go to https://streamyard.com/facebook and click ‘Let Streamyard see your live Facebook comments’ (you can include this link in the description of your broadcast).
Alternatively, if you have all streams open in other tabs or devices (tablet or a phone) you’ll be able to see from which user and destination each comment has been made (remember to have it muted if you have your live video playing on another device while you’re streaming live).
Pro tip: If streaming to more than one destination we strongly recommend you open the destinations on a different device, for example your mobile phone or a pad so that the sound does not interfere with your broadcast.
Thirdly, note the warning that appears above the Comments box. If you post comments in this box inside Streamyard (instead of commenting on each comment left in the live stream post on each social network) they will only be posted in public broadcast destinations and not in private groups. To answer comments left in a group in real time, you have to go directly into the group and comment.
Going live with Streamyard
Now that we have reviewed all the features of Streamyard Studio you should be ready to go live. To do that, simply click on the Go Live button that is on the top right corner.

It will take a few seconds until the time counter starts to run on the top left hand side of your screen (i.e. there is a very short delay from hitting the button to when you start broadcasting live). This is also the same spot where you will see the number of live viewers.
The number of live viewers are cumulative from all destinations. Public reactions to the video will be shown next to the counter. If you pre-scheduled the broadcast, previous comments and reactions will be shown in your comments box. Your guest speaker will not see the number of live viewers, but, as mentioned before, can see the comments as they are made live.
Pro tip: Remember the issue with Facebook not disclosing usernames with third party apps? The same happens with reactions. So, if one of your viewers reacts to your video (Like, Love, Wow, Angry, Sad), it will not show in the counter at the top, only public reactions do.
Streamyard review: The verdict

Below is a summary of the reasons why Streamyard is the best live streaming tool out there for its price point:
- It allows you to stream to up to 3 destinations and gives you the RTMP and stream key to share your stream in other destinations such as your website.
- It lets you customize your stream with branding elements, including overlays, backgrounds and your logo.
- You can play videos of up to 5minutes during the stream allowing you to create intro and outro clips for your live streams or share a promotional video related to the live stream.
- It provides several interactive tools to connect with your live audience.
- It does not require signin, local software downloads and is available to all kinds of operating systems.
- It lets you share your screen and have up to 10 participants, including 6 concurrently live.
In a nutshell, it gives you more than Be.Live or eCamm for less.
Learn Our Secrets to Growing 15 Groups to 100k + Members! Get Our E-Book!
400 + Actionable Pages
390 + How-to Screenshots
32 Proven Unpaid Growth Strategies
My group has exploded using your strategies. A competing group actually asked me how I was growing so quickly!!
cs2 skin changer free – skin changer cs2 download, skinchanger for cs 2